WebMCP: make your site "agent-ready" in Chrome
Sommaire
- Why "clicking" agents break (and cost)
- What is WebMCP?
- WebMCP vs MCP (backend)
- The imperative API:
navigator.modelContext - The declarative API: turning a
<form>into a tool - Security, consent, and "human‑in‑the‑loop" (the real topic)
- Current limitations (to acknowledge in the article)
- How to test today (February 2026)
- Adoption strategy (simple, realistic)
- FAQ
- Conclusion
- Useful links
Why "clicking" agents break (and cost)
Today, many web agents pretend to be humans. They read screenshots, guess where the right button is, click, wait, repeat.
It works… until the day you change a label, a layout, or a flow. And then: flaky behavior, latency, token‑burn, and bugs that are hard to diagnose.
WebMCP tries to put a simple idea back at the center: if your site already knows how to perform an action, describe it properly.
What is WebMCP?
WebMCP adds a "machine‑readable" layer on top of your web interface. You expose tools that the browser can present to an agent.
Chrome talks about two complementary APIs:
- Declarative API: turn HTML forms into tools (low effort, big win).
- Imperative API: declare tools in JavaScript (more powerful, more flexible).
WebMCP vs MCP (backend)
The classic Model Context Protocol (MCP) is designed client <---> server.
You expose your tools via a service (Node/Python), then an agent consumes them remotely (like a REST API for example).
WebMCP, however, runs in a tab. You can see it as "an MCP server… on the client side", closest to the UI and the user session.
Direct consequence:
- you reuse your existing front-end code (state, auth, UI logic),
- you can do proper human‑in‑the‑loop,
- but you need a browsing context (no pure headless at this stage).
The imperative API: navigator.modelContext
The imperative API is useful when your UI is dynamic, or when you want to return structured results without using a form.
The 4 methods to know
provideContext({ tools }): replaces the entire set of tools (useful in SPAs).registerTool(tool): adds a tool without touching the others.unregisterTool(name): removes a tool.clearContext(): clears everything.
What exactly is a tool?
A tool is a JSON definition + an execute function.
The game changer: the inputSchema (JSON Schema) that formalizes the input.
You can also annotate the tool with a hint readOnlyHint when it modifies nothing.
Example: exposing a product search (JSON return)
// Exemple minimal : un tool côté client.
// Objectif : éviter que l’agent scrolle, clique 12 filtres et parse du HTML.

if ("modelContext" in navigator) {
  navigator.modelContext.registerTool({
    name: "search_products",
    description: "Recherche des produits dans le catalogue",
    annotations: { readOnlyHint: true },
    inputSchema: {
      type: "object",
      additionalProperties: false,
      properties: {
        query: { type: "string", description: "Texte libre" },
        category: { type: "string", description: "Catégorie (slug)" },
        minPrice: { type: "number", description: "Prix minimum" },
        maxPrice: { type: "number", description: "Prix maximum" }
      },
      required: ["query"]
    },

    // execute peut être async.
    // Le 2e param (client) sert notamment à demander une interaction utilisateur.
    execute: async ({ query, category, minPrice, maxPrice }, client) => {
      const params = new URLSearchParams({ query });
      if (category) params.set("category", category);
      if (minPrice != null) params.set("minPrice", String(minPrice));
      if (maxPrice != null) params.set("maxPrice", String(maxPrice));

      const res = await fetch(`/api/products/search?${params.toString()}`);
      if (!res.ok) {
        // Astuce : renvoyer une erreur explicite aide l’agent à se corriger.
        return { ok: false, error: `Search failed (${res.status})` };
      }

      const data = await res.json();
      return { ok: true, results: data.results };
    }
  });
}
Design rules that avoid "unusable" tools
- Name with verb + object:
search_products,create_ticket,book_flight. - Keep it small: one tool = one clear intent.
- Return structured data: stable JSON, not a text blob.
- Handle errors: codes, messages and missing fields.
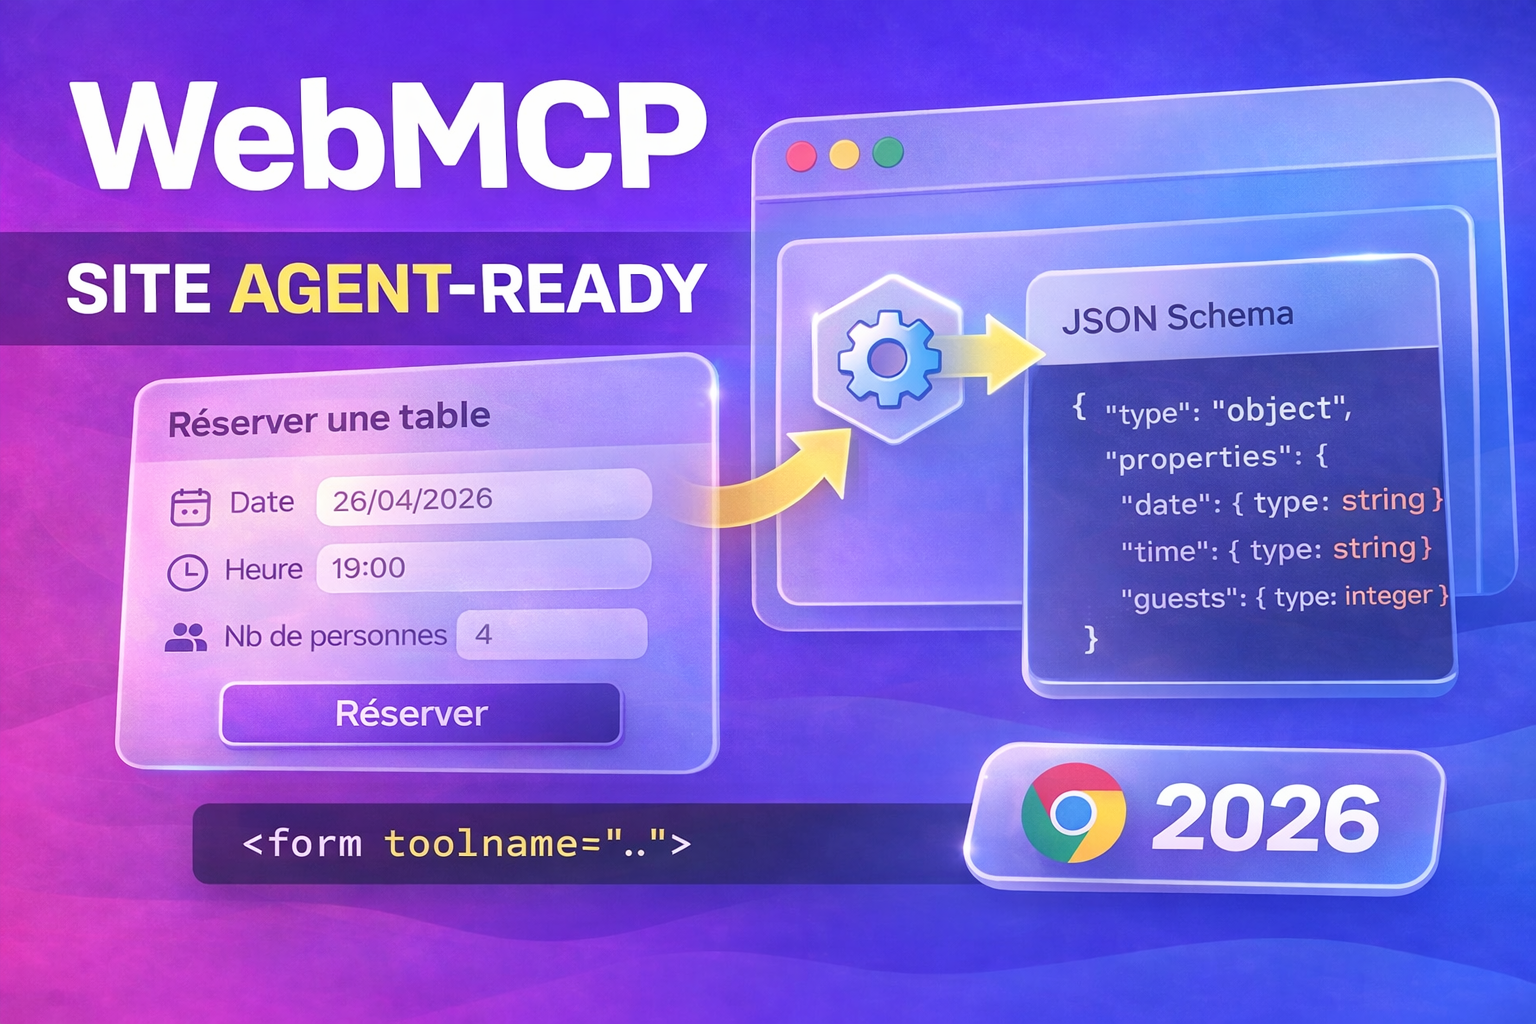
The declarative API: turning a <form> into a tool
This is the most gradual transition. Your form remains 100% usable by a human, and if WebMCP is available, it also becomes invocable by an agent.
Key attributes
toolname: tool identifier.tooldescription: natural language description.toolparamdescription: description of a field (parameter).toolautosubmit: allows submission without manual click.
Without toolautosubmit, Chrome can pause agent-side execution and wait for a user action.
It’s a "permission‑first" approach that avoids surprises.
Example: reservation form
<form
  toolname="book_table"
  tooldescription="Réserver une table au restaurant"
  action="/reserve"
  method="post"
>
  <label for="date">Date</label>
  <input
    id="date"
    name="date"
    type="date"
    required
    toolparamdescription="Date de réservation"
  />

  <label for="time">Heure</label>
  <input
    id="time"
    name="time"
    type="time"
    required
    toolparamdescription="Heure (format local)"
  />

  <label for="guests">Convives</label>
  <input
    id="guests"
    name="guests"
    type="number"
    min="1"
    max="12"
    required
    aria-description="Entre 1 et 12"
  />

  <button type="submit">Réserver</button>
</form>
Accessibility: here, WebMCP rewards good practices
Chrome builds parameter descriptions prioritizing:
toolparamdescriptionif present,- otherwise the
labeltext, - otherwise
aria-description.
Translation: if your forms are clean (associated labels, useful ARIA), you've already done 80% of the work. And you improve the experience for screen readers in the process (WCAG 2.2, etc.).
UI signals to inspire confidence
WebMCP also introduces useful "visual" signals:
toolactivationandtoolcancelevents (dispatched onwindow),- CSS pseudo‑classes
:tool-form-activeand:tool-submit-active.
This lets you display a clear state when an agent is "driving" the page. Your user sees what is happening, instead of enduring opaque magic.
window.addEventListener("toolactivation", (e) => {
  console.log("Tool started:", e.toolName);
});

window.addEventListener("toolcancel", (e) => {
  console.log("Tool cancelled:", e.toolName);
});
/* Petit feedback visuel pendant l’interaction agent */
form:tool-form-active { outline: 2px solid currentColor; }
button:tool-submit-active { opacity: 0.7; }
Security, consent, and "human‑in‑the‑loop" (the real topic)
The risk, when talking about agents, is shifting to a web that performs actions "behind your back". WebMCP rather pushes a reverse logic: the browser arbitrates.
On the imperative side, you can request a user interaction during execute.
On the declarative side, the absence of toolautosubmit forces a human gesture.
My advice: start with a simple framework.
- Read‑only tools: search, filters, data reading.
- Write tools: behind explicit confirmation.
Current limitations (to acknowledge in the article)
WebMCP is still early. And it shows in the constraints.
- Tab required: tools live in a top‑level browsing context.
- Discoverability: no native "catalog" of tools per site.
- Rapid evolution: it’s a Community Group draft, so it’s moving.
Take it as a signal: the direction is clear, the API will stabilize. But we are still in the phase where you should prototype, not overhaul your information system.
How to test today (February 2026)
1) Access the early preview
WebMCP is offered as part of the Chrome Early Preview Program (EPP). The goal is to prototype, give feedback, and iterate quickly.
2) Use Chrome Canary + flag
The tooling around WebMCP mentions Chrome 146+ with the flag:
chrome://flags→ WebMCP for testing
3) Inspect tools with "Model Context Tool Inspector"
An extension allows listing the tools exposed by the page, and executing them. It’s perfect to validate your schema, your naming, and your payload.
Adoption strategy (simple, realistic)
If you want to talk about it "like a field dev", here’s a 3-step approach.
Step 1 — Start with forms
Find your 3 most frequent forms:
- search,
- contact/support,
- checkout / reservation,
- advanced filters.
Add toolname + tooldescription.
Then improve the quality of labels and descriptions.
Step 2 — Add 1 or 2 high‑ROI imperative tools
Typical examples:
search_productsthat returns clean JSON,create_support_ticketthat pre-fills technical info.
Your goal: replace 20 UI actions with 1 call.
Step 3 — Add safeguards
readOnlyHintwhen it’s read.- Confirmation (human‑in‑the‑loop) when it’s write.
- Logging and observability: you want to be able to reproduce "what the agent did".
FAQ
"Does this replace accessibility?"
No. But it can help certain journeys (conversational UI), especially when a site’s accessibility tree is poor. The winning combo remains: solid accessibility + clear tools.
"Do I have to add WebMCP everywhere?"
No. Start with critical and repetitive flows. The rest will come if "agent" traffic becomes a real topic.
"Does it work on all browsers?"
Not today. But Google and Microsoft are co‑working on the standardization. It’s worth being an early adopter on a small perimeter.
Conclusion
WebMCP is not "just another AI thing". It’s an attempt to make the web more accessible to agents without breaking the human web.
If you already have good forms and a well‑structured UI, you have an advantage. And if you want to go further, the imperative API lets you expose robust, versioned, testable actions.
Useful links
- Chrome — WebMCP early preview (10 February 2026)
- Spec (W3C Web Machine Learning Community Group)
- Repo WebMCP (proposal + context)
- Chromium — declarative (toolname/tooldescription)
- Chromium — toolparamdescription
- Chromium — toolautosubmit (pause user)
- Chromium — events toolactivation/toolcancel
- Chromium — pseudo-classes :tool-form-active / :tool-submit-active
- Model Context Tool Inspector (extension)
- Chrome DevTools MCP
Comments
Loading...